Setting up freeGLUT on MinGW
Last Updated: Aug 9th, 2012
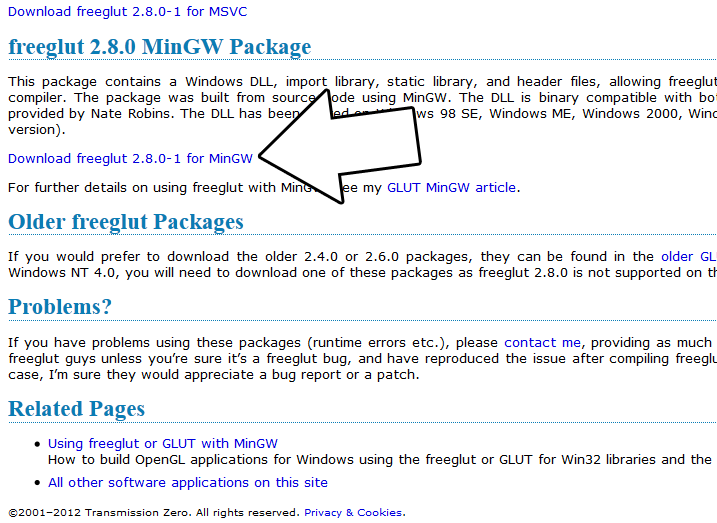
1)First thing you need to do is download freeGLUT headers and binaries. You will find them on the freeGLUT website, specifically
on this page.
Scroll down to the Prepackaged Releases section and click on the prepackaged windows binaries page.

Then download the MinGW binaries archive.

Open the zip archive and there should be a folder called "freeglut". Copy that entire folder and put it anywhere you'd like. For these tutorials I'm putting it in a directory I created called C:\mingw_dev_lib
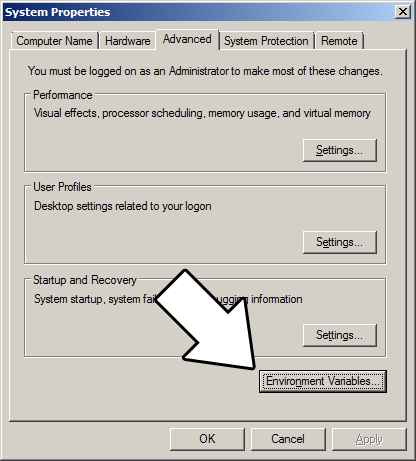
2)Next you're going to want to get up the path for mingw so you can run mingw commands in any directory. Open up the system menu either by A) right clicking My Computer and selecting Properties or B) going to the Control Panel and selecting the system menu. Once your in the system menu, click advanced system settings.
and then click environment variables
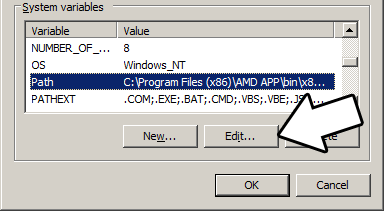
Under system variables, select the "Path" variable and click edit.
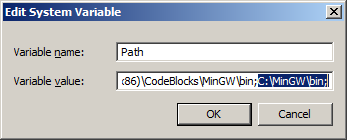
What the path variable does is tell the OS where to look when running an executable. What we want to do is whenever we run the g++ command, the OS should look in the MinGW bin directory where g++.exe is located. If you installed MinGW by itself, the MinGW bin directory should be
Append it to the long list of paths with a semi-colon after it and click ok. If you're using an IDE like Code::Blocks which uses MinGW, you can also set its MinGW bin directory which should be at
Now when ever you run a command that uses a MinGW executable, the OS will know to look in the MinGW bin directory.
3)Now go download the source for lesson 01. Extract the source somewhere. Open up a command window in the directory by holding shift and right clicking.
Now compile by entering this big old command (This command assumed you have freeGLUT extracted at C:\mingw_dev_lib\freeglut):
As the programs get bigger and bigger, having to manually punch in this compilation command gets very tedious very quickly. This is why I recommend using Make.
4) MingGW Make allows you to make build scripts that'll automate the compilation process.
Scroll down to the Prepackaged Releases section and click on the prepackaged windows binaries page.

Then download the MinGW binaries archive.

Open the zip archive and there should be a folder called "freeglut". Copy that entire folder and put it anywhere you'd like. For these tutorials I'm putting it in a directory I created called C:\mingw_dev_lib
2)Next you're going to want to get up the path for mingw so you can run mingw commands in any directory. Open up the system menu either by A) right clicking My Computer and selecting Properties or B) going to the Control Panel and selecting the system menu. Once your in the system menu, click advanced system settings.

and then click environment variables

Under system variables, select the "Path" variable and click edit.

What the path variable does is tell the OS where to look when running an executable. What we want to do is whenever we run the g++ command, the OS should look in the MinGW bin directory where g++.exe is located. If you installed MinGW by itself, the MinGW bin directory should be
C:\MinGW\binAppend it to the long list of paths with a semi-colon after it and click ok.

C:\Program Files (x86)\CodeBlocks\MinGW\binNow when ever you run a command that uses a MinGW executable, the OS will know to look in the MinGW bin directory.
3)Now go download the source for lesson 01. Extract the source somewhere. Open up a command window in the directory by holding shift and right clicking.

Now compile by entering this big old command (This command assumed you have freeGLUT extracted at C:\mingw_dev_lib\freeglut):
g++ LUtil.cpp main.cpp -IC:\mingw_dev_lib\freeglut\include -LC:\mingw_dev_lib\freeglut\lib -w -Wl,-subsystem,windows -lOpenGL32 -lglu32 -lfreeGLUT -o 01_hello_freeglutAs the programs get bigger and bigger, having to manually punch in this compilation command gets very tedious very quickly. This is why I recommend using Make.
4) MingGW Make allows you to make build scripts that'll automate the compilation process.
From Basic Makefile
#OBJS specifies which files to compile as part of the project
OBJS = LUtil.cpp main.cpp

#OBJ_NAME specifies the name of our exectuable
OBJ_NAME = 01_hello_freeglut

#This is the target that compiles our executable
all : $(OBJS)
	g++ $(OBJS) -IC:\mingw_dev_lib\freeglut\include -LC:\mingw_dev_lib\freeglut\lib -w -Wl,-subsystem,windows -lOpenGL32 -lglu32 -lfreeGLUT  -o $(OBJ_NAME)
Here we have a basic Makefile. At the top we declare and set the "OBJS" macro which specifies which files we're compiling. Then we set the "OBJ_NAME" macro that specifies
the name of our executable.
After setting these two macros, we have the "all" target which compiles the program. It's followed by the dependencies which as you can see is the OBJS macro, because obviously you need the source files to compile the program.
After specifying the name of the target and its dependencies, the command to create the target is on the next line. The command to create the target must begin with a tab or Make will reject it.
As you would expect, the command to compile the program is largely the same as the command we would compile it off the command line. A key difference is that we have macros that we insert into the command which makes things like adding new files to the project must easier since you only have to change the macro as opposed to changing the whole command.
In future tutorials, we will be using more libraries and more source files. We should probably use more macros to make the process of adding them easier.
From Makefile
#OBJS specifies which files to compile as part of the project
OBJS = LUtil.cpp main.cpp

#CC specifies which compiler we're using
CC = g++

#INCLUDE_PATHS specifies the additional include paths we'll need
INCLUDE_PATHS = -IC:\mingw_dev_lib\freeglut\include

#LIBRARY_PATHS specifies the additional library paths we'll need
LIBRARY_PATHS = -LC:\mingw_dev_lib\freeglut\lib

#COMPILER_FLAGS specifies the additional compilation options we're using
# -w suppresses all warnings
# -Wl,-subsystem,windows gets rid of the console window
COMPILER_FLAGS = -w -Wl,-subsystem,windows

#LINKER_FLAGS specifies the libraries we're linking against
LINKER_FLAGS = -lOpenGL32 -lglu32 -lfreeGLUT

#OBJ_NAME specifies the name of our exectuable
OBJ_NAME = 01_hello_freeglut

#This is the target that compiles our executable
all : $(OBJS)
	$(CC) $(OBJS) $(INCLUDE_PATHS) $(LIBRARY_PATHS) $(COMPILER_FLAGS) $(LINKER_FLAGS) -o $(OBJ_NAME)
Now our compilation command is much more flexible.
Near the top we have the macros that define the files we're compiling and the compiler we're using.
Next we have the "INCLUDE_PATHS" macro which specifies the additional directories we're getting header files from. As you can see, we're using the include directory from the freeGLUT folder we extacted earlier. The "LIBRARY_PATHS" sets the additional library file paths. Notice how there's a -I before every include directory and a -L before every library directory.
The "COMPILER_FLAGS" macro are the additional options we use when compiling. In this case we're disabling all warnings and disabling the console window. The "LINKER_FLAGS" macro specifies which libraries we're linking against. Here we're compiling against OpenGL, GL Utilities, and freeGLUT. Notice how there's a -l flag before every library.
Finally at the bottom we have our target compiling using all of our macros. Thanks to macros we can very easily change the macros to add more files and libraries as we need them.
Save this Makefile code to a file named "Makefile" (case sensitive with no file extension) or you can use the one I premade here. Open a command line in the directory with the source files and run the command mingw32-make.exe. Make will search for a file named "Makefile" in the directory Make was called in and run the Makefile that will compile your code.
Now that you have OpenGL and freeGLUT compiling, it time to go onto part 2 of the tutorial.
The documentation for OpenGL can be found here.
The documentation for GLUT (the API freeGLUT is based on) can be found here.
The documentation for freeGLUT can be found here.
Hello OpenGL Part 2: Your First Polygon
The documentation for GLUT (the API freeGLUT is based on) can be found here.
The documentation for freeGLUT can be found here.
Hello OpenGL Part 2: Your First Polygon