
Hello OpenGL - Your First Polygon

Last Updated: Aug 9th, 2012
This tutorial covers the first major stepping stone: getting something on the screen.Now that you have freeGLUT set up, it's time to make a bare bones OpenGL graphics application that renders a quad on the screen.
From LOpenGL.h
#ifndef LOPENGL_H
#define LOPENGL_H

#include <GL/freeglut.h>
#include <GL/gl.h>
#include <GL/glu.h>
#include <stdio.h>

#endif
Before diving into the real code, I wanted to point out the LOpenGL.h header file. This file includes the freeGLUT, the gl.h (the OpenGL header), and glu.h (the OpenGL Utilities
header). We'll talk about the OpenGL Utilities when we get to error reporting. For those of you working on Visual Studio, it's especially important to include freeGLUT before
OpenGL because the compiler will bark at you otherwise.
We'll be including this header when ever we need to include OpenGL headers in our code. By having our OpenGL headers wrapped in this file, we can easily port the OpenGL code to other windowing systems like SDL, Qt, GTK, etc which have their own OpenGL headers.
We'll be including this header when ever we need to include OpenGL headers in our code. By having our OpenGL headers wrapped in this file, we can easily port the OpenGL code to other windowing systems like SDL, Qt, GTK, etc which have their own OpenGL headers.
From LUtil.h
#include "LOpenGL.h"

//Screen Constants
const int SCREEN_WIDTH = 640;
const int SCREEN_HEIGHT = 480;
const int SCREEN_FPS = 60;
Here we're starting off in LUtil.h. LUtil.h and LUtil.cpp are the utility source files we'll use to hold the initialization and main loop functions. What is the main loop you ask?
We'll get to that in a little bit.
After including our OpenGL header we define the screen width/height and the screen frames per second.
After including our OpenGL header we define the screen width/height and the screen frames per second.
From LUtil.h
bool initGL();
/*
Pre Condition:
 -A valid OpenGL context
Post Condition:
 -Initializes matrices and clear color
 -Reports to console if there was an OpenGL error
 -Returns false if there was an error in initialization
Side Effects:
 -Projection matrix is set to identity matrix
 -Modelview matrix is set to identity matrix
 -Matrix mode is set to modelview
 -Clear color is set to black
*/

void update();
/*
Pre Condition:
 -None
Post Condition:
 -Does per frame logic
Side Effects:
 -None
*/

void render();
/*
Pre Condition:
 -A valid OpenGL context
 -Active modelview matrix
Post Condition:
 -Renders the scene
Side Effects:
 -Clears the color buffer
 -Swaps the front/back buffer
*/
Now let's declare some functions. First we declare initGL() which initializes the graphics library. Under each function declaration, you'll see a pre condition, post condition, and
side effects. Don't obsess too much over what these say right now. For those of you unfamiliar with pre conditions, post conditions, and side effects here's some nutshell
definitions:
Now let's talk about animation. The basic concept of animation is to take a sequence of images like the these:

Then show one right after the other (in this case at a rate of 10 frames per second) to create the illusion of movement:

In just about any game or simulation program, there is some sort of loop that updates the game logic and renders. Here we see update() which updates the game logic, and render() which renders the scene. We'll cover how to get our main loop running when we get to main.cpp.
- Pre Condition: What must be true before the function is called
- Post Condition: What will be true after the function is called
- Side Effects: Any changes the function makes outside the class
Now let's talk about animation. The basic concept of animation is to take a sequence of images like the these:
Then show one right after the other (in this case at a rate of 10 frames per second) to create the illusion of movement:
In just about any game or simulation program, there is some sort of loop that updates the game logic and renders. Here we see update() which updates the game logic, and render() which renders the scene. We'll cover how to get our main loop running when we get to main.cpp.
From LUtil.cpp
bool initGL()
{
    //Initialize Projection Matrix
    glMatrixMode( GL_PROJECTION );
    glLoadIdentity();

    //Initialize Modelview Matrix
    glMatrixMode( GL_MODELVIEW );
    glLoadIdentity();
Now here's the start of the actual code for our initialization function. Before we start going over this code, let me mention that the pre condition for this function was that a
valid OpenGL context is active. An OpenGL context is something that holds OpenGL information (textures, shaders, state machine variables, etc) so we can start making OpenGL calls.
In main(), we'll create an OpenGL window with an OpenGL context using freeGLUT before calling this function.
Getting back to the code, here we initialize projection and modelview matrices. For now, all you need to know about the projection and modelview matrices is that they're two matrices that geometry data is multiplied against before rendering. By setting them both to the identity matrix, whatever geometry you send is what you will get rendered since the identity matrix just gives you the same vector back when you multiply against it.
Now let's touch on the OpenGL state machine. When we call glMatrixMode() with GL_PROJECTION, we're saying that we want the current matrix to be the projection matrix. When we call glLoadIdentity(), it loads the identity matrix into the current matrix. OpenGL does texturing (which will be covered in a future tutorial) in a similar way. You bind a current texture and any texture operations are done using the current texture. This is what we mean by state machine, a state variable is set and operations are done using the current state.
After the projection matrix is initialized, we set the current matrix to be the modelview matrix, and set that to be the identity matrix too.
From LUtil.cpp
    //Initialize clear color
    glClearColor( 0.f, 0.f, 0.f, 1.f );

    //Check for error
    GLenum error = glGetError();
    if( error != GL_NO_ERROR )
    {
        printf( "Error initializing OpenGL! %s\n", gluErrorString( error ) );
        return false;
    }

    return true;
}
After initializing the matrices, we set the current clear color to be black with glClearColor(). The first argument is red, the second is green, the third is blue,
and the last is alpha. The clear color is the color the screen is filled with when you call glClear() to clear the screen. Unlike the usual 0 to 255 integer value for color data,
glClearColor() uses a 0 to 1 floating point value for its coloring.
After the matrices and clear color are initialized, we check if there were any errors with glGetError(). If there was an error, we write the error to the console using gluErrorString(). GLU (OpenGL Utilities) gives us useful functions that aren't part of the OpenGL standard. In this case glGetError() returns an integer error code, and gluErrorString() turns that error code into a C string for us to print to the the console.
If there was an error, the function returns false. On success it returns true.
From LUtil.cpp
void update()
{

}
Since for this demo all we have is a stationary quad, there's no real game logic to update.
From LUtil.cpp
void render()
{
    //Clear color buffer
    glClear( GL_COLOR_BUFFER_BIT );
Here's the start of our rendering function. Before we start drawing, we clear the color buffer using glClear() with color set with glClearColor(). The color buffer are pretty much
the pixels that are drawn to the screen. There are other buffers like the depth buffer and stencil buffer, but we'll talk about those in future tutorials.
From LUtil.cpp
    //Render quad
    glBegin( GL_QUADS );
        glVertex2f( -0.5f, -0.5f );
        glVertex2f(  0.5f, -0.5f );
        glVertex2f(  0.5f,  0.5f );
        glVertex2f( -0.5f,  0.5f );
    glEnd();
After the screen is cleared, glBegin() called to start drawing the quad. Now we can start rendering the quad by sending vertices. A vertex is a point that defines geometry, in this
case the corners of a quadrilateral. We send each of the corner points and it connects them like so:
 Vertex order matters because the 1st/2nd are one side, 2nd/3rd are the next side, 3rd/4th are the next side, and the last side is the 4th/1st. You can send the vertices for the
quad in a clockwise or counter clockwise order, but you're going to get funky results in any other order.
Vertex order matters because the 1st/2nd are one side, 2nd/3rd are the next side, 3rd/4th are the next side, and the last side is the 4th/1st. You can send the vertices for the
quad in a clockwise or counter clockwise order, but you're going to get funky results in any other order.
We send verticies to the GPU (graphics processing unit) using glVertex() with the first argument being the x coordinate and the second being the y coordinate. Since OpenGL is implement here as a C API and C does not support function overloading, many OpenGL functions have differently named versions based on the arguments they take in. In this case, it's 2 floats. If you wanted to send in three dimensional vertices, you would call glVertex3f (3 floats).
After we're done sending the vector coordinates, we call glEnd() to specify that we're done sending vertices and to render our quad. Note: if we wanted to render 2 quads here, we do not need to call glBegin() and glEnd() again. We can just call glBegin() once, send 8 vertices ( 4 vertices * 2 quads ), and call glEnd() once to have it render 2 quads at once.
From LUtil.cpp
    //Update screen
    glutSwapBuffers();
}
At the end of our render() function, we update the screen using glutSwapBuffers().
In this application, we're going to use a double buffered window. What this means is that we have two buffers, a front and back buffer. The front buffer is what the user sees. The back buffer is in memory. When we make rendering calls in a double buffered window, they are rendered to the back buffer. After we're done rendering what we want to show to the user, we swap the front buffer with the back buffer so the user sees what we originally rendered to the back buffer.
Now in a single buffered window, everything is draw directly to the front buffer. This means the user will see geometry as it's being rendered, which means they may see unfinished rendering and tearing.
From main.cpp
#include "LUtil.h"

void runMainLoop( int val );
/*
Pre Condition:
 -Initialized freeGLUT
Post Condition:
 -Calls the main loop functions and sets itself to be called back in 1000 / SCREEN_FPS milliseconds
Side Effects:
 -Sets glutTimerFunc
*/

int main( int argc, char* args[] )
{
    //Initialize FreeGLUT
    glutInit( &argc, args );
Here's the top of main.cpp. main.cpp will function as driver source code that puts everything together.
After including our utility header, we declare the protype for the runMainLoop() function. This function will be used to render 60 frames a second.
At the top of our main() function we call glutInit() to initialize freeGLUT.
After including our utility header, we declare the protype for the runMainLoop() function. This function will be used to render 60 frames a second.
At the top of our main() function we call glutInit() to initialize freeGLUT.
From main.cpp
    //Create OpenGL 2.1 context
    glutInitContextVersion( 2, 1 );
Here we set our OpenGL context version to be 2.1. OpenGL 2.1 uses the fixed function pipeline and supports using GLSL shaders. With OpenGL 3.0+, a lot of features were deprecated
and then removed in favor of using GLSL shaders for all rendering. For example, glMatrixMode() and glLoadIdentity() were deprecated in favor of you managing your own matrices with
GLSL. So to have it so OpenGL manages our matrices for us, we use the old style fixed function pipeline in OpenGL 2.1. We'll cover the difference between fixed function
pipelines and programmable pipelines in future tutorials.
Note: glutInitContextVersion() is not part of GLUT, but additional functionality added by freeGLUT. If this line causes an error, just comment it out.
Note: glutInitContextVersion() is not part of GLUT, but additional functionality added by freeGLUT. If this line causes an error, just comment it out.
From main.cpp
    //Create Double Buffered Window
    glutInitDisplayMode( GLUT_DOUBLE );
    glutInitWindowSize( SCREEN_WIDTH, SCREEN_HEIGHT );
    glutCreateWindow( "OpenGL" );
Here we set our window to be double buffered using glutInitDisplayMode(). After that we call glutInitWindowSize() to set our window dimensions. After all our window attributes are
set, our window is created with the caption "OpenGL" using glutCreateWindow().
From main.cpp
    //Do post window/context creation initialization
    if( !initGL() )
    {
        printf( "Unable to initialize graphics library!\n" );
        return 1;
    }
Now that our OpenGL window with OpenGL context is created, we call our graphics library initialization function.
From main.cpp
    //Set rendering function
    glutDisplayFunc( render );
We set our rendering callback with glutDisplayFunc so whenever freeGLUT needs to update the screen, it calls our render() function.
From main.cpp
    //Set main loop
    glutTimerFunc( 1000 / SCREEN_FPS, runMainLoop, 0 );
Here we call glutTimerFunc() to set a timer call back. After 1000 / SCREEN_FPS milliseconds, runMainLoop() be called. We'll cover how that function works in a little bit.
From main.cpp
    //Start GLUT main loop
    glutMainLoop();

    return 0;
}
At the end of our main() function, we start the freeGLUT main loop so it can start working and we can start interacting with our application. This runs freeGLUT's internal main
loop not our main loop.
From LUtil.cpp
void runMainLoop( int val )
{
    //Frame logic
    update();
    render();

    //Run frame one more time
    glutTimerFunc( 1000 / SCREEN_FPS, runMainLoop, val );
}
Here's the function that runs our main loop.
As you can see, it first calls our two main loop functions. After that it establishes a callback with glutTimerFunc().
What this call to glutTimerFunc() does is set it so it in 1000 millseconds / 60 (or in a 60th of a second), freeGLUT will call runMainLoop() again, and pass it value "val".
What this means is that when we call this function, it will run the main loop functions and set a call back to run itself again. When the callback runs, it will run the main loop functions and call itself again in a 60th of a second. So what this call back loop does is ensure that the main loop functions are called every 60th of a second to give us a 60 frames per second frame rate.
When you compile and run this tutorial source, you'll probably notice something strange:

The coordinates we gave were ( -0.5f, -0.5f ), ( 0.5f, -0.5f ), ( 0.5f, 0.5f ), and ( -0.5f, 0.5f ). The height and width should be equal. And while we're at it, how is a quad with a span of 1 take up so much of the screen?
The answer is that OpenGL defaults to normalized coordinates which treats the left side of the rendering area as x = -1, the right side as x = 1, the bottom as y = -1, and the top as y = 1.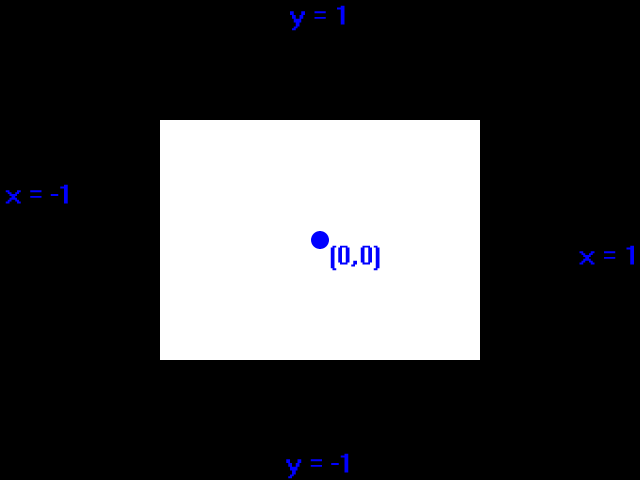
Since the render area is wider than it is tall, the same coordinates are going to render wider.
How do we fix this? With matrices, which we'll cover in the next tutorial.
Before continuing on with the tutorial set there's a few things we should address.
Application crashes at glutInitContextVersion( 2, 1 ); with error glXCreateContextAttribsARB not found - This means your GPU does not support the glXCreateContextAttribsARB OpenGL extension. This also means your GPU does not support OpenGL 3.0 and later. For now, comment glutInitContextVersion( 2, 1 ); out. When we get to the GLEW and Extensions tutorials, we'll cover OpenGL extended functionality.
Each of these have their various features/advantages/disadvantages depending on what you're doing. With some researching and testing you can find the one that's right for you.
My philosophy for this tutorial set is this: learn the basics with the fixed function pipeline handling it for you and then use that knowledge to build your own graphics pipeline. Besides, there are a lot of legacy systems that need maintaining. As recently as winter 2011, I was working on a system that only supported OpenGL 1.3.
Debugging Your Application
Here are some common bugs that you may run into:Application crashes at glutInitContextVersion( 2, 1 ); with error glXCreateContextAttribsARB not found - This means your GPU does not support the glXCreateContextAttribsARB OpenGL extension. This also means your GPU does not support OpenGL 3.0 and later. For now, comment glutInitContextVersion( 2, 1 ); out. When we get to the GLEW and Extensions tutorials, we'll cover OpenGL extended functionality.
About using freeGLUT
I wanted to let people know that this is an OpenGL tutorial set, not a freeGLUT tutorial set. I won't be going into any advanced freeGLUT features because freeGLUT is just being used to provide windowing and input. OpenGL and rendering are the focus here.Alternatives to freeGLUT
While freeGLUT isn't the most feature rich OpenGL windowing system, it's good at providing windowing functionality for quick graphical demos. However if you're trying to look into doing something more complex, you may want to look into something else to handle your windowing. Here's a few you may want to consider (in order that I could recall them):- SDL - Version 1.2 supports OpenGL 2.1, Version 1.3 (currently in Beta) supports OpenGL 3+
- Qt
- GTK
- SFML - Version 1.6 supports OpenGL 2.1, Version 2.0 (currently in Beta) supports OpenGL 3+
- wxWidgets
- Windows API with wgl
- NSOpenGL, AGL, or CGL for Mac OSX
- X Windows and GLX for *nix
Each of these have their various features/advantages/disadvantages depending on what you're doing. With some researching and testing you can find the one that's right for you.
On Using OpenGL 2.1
Some of you may be griping that I'm using OpenGL 2.1 for the early tutorials. While it is true that newer techniques are used for modern OpenGL applications, they're also more difficult to use. While someone experienced can just look at the GLSL and easily move over from fixed function pipeline to programmable pipeline, for someone new to graphics programming GLSL code can be a bit overwhelming. It's important for me to have these tutorials be accessible to as broad an audience as possible.My philosophy for this tutorial set is this: learn the basics with the fixed function pipeline handling it for you and then use that knowledge to build your own graphics pipeline. Besides, there are a lot of legacy systems that need maintaining. As recently as winter 2011, I was working on a system that only supported OpenGL 1.3.
Download the media and source code for this demo here.
To learn more about pixels and color, check out my article What is a pixel? which covers coloring in 0 to 255 scale.
Back to Index
To learn more about pixels and color, check out my article What is a pixel? which covers coloring in 0 to 255 scale.
Back to Index