
Setting up SDL Extension Libraries on Visual Studio 2010 Ultimate
Last Updated: Aug 22nd, 2022
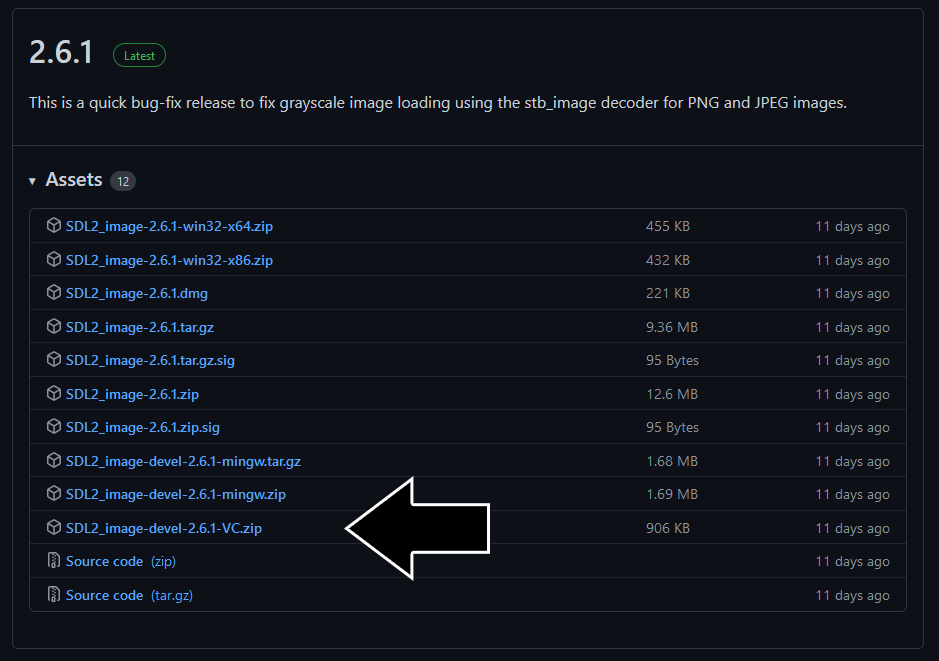
1) First thing you need to do is download SDL_image headers and binaries. You will find them on the SDL_image website, specifically on
this page.
You'll want to download the visual c++ development libraries.
2) Open the zip archive and there should be a folder that contains folders called include and another one called lib. Copy the contents of the folder and put them where you want. I recommend putting them in the same directory where you put your SDL install. For these tutorials I'm putting them in a directory I created called C:\vs_dev_lib
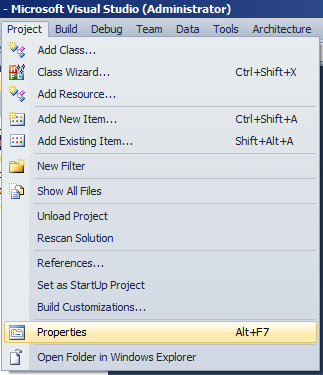
3) Open your SDL project and go to project properties.
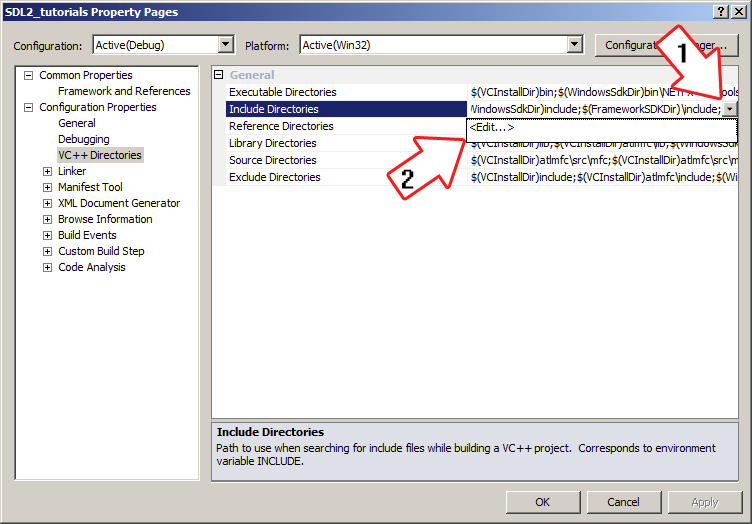
4) Now we have to tell Visual C++ to search for header files in the SDL extension include folder we just extracted. Under Configuration Properties in the VC++ Directories menu, select the Include Directories field, click the tiny down arrow button, and click edit.
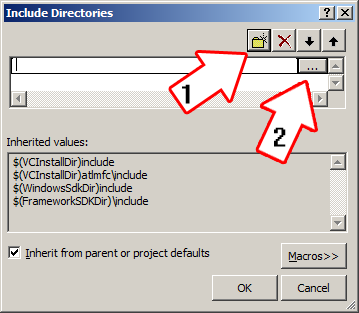
5) Click the folder icon, and then click the button that pops up.
6) Now go find the SDL_image (or SDL_ttf/SDL_mixer) folders you extracted, and select the include folder and click OK.
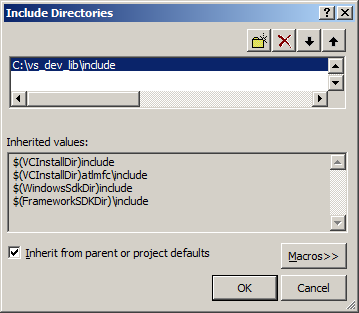 Now Visual Studio knows where to find the header files. If you get an error that the compiler can't find SDL_image.h (or SDL_ttf.h/SDL_mixer.h), it means you messed up this step.
You may have noticed that the directory added here is the same from the setting up SDL tutorial. This is because I over wrote the include directory so it has both the headers from SDL 2 and SDL_image/SDL_ttf/SDL_mixer headers are in the same directory. If you did this you can skip this step because our project already knew where to find the header files. Some prefer keep their SDL and SDL extension libaries in different directories, some prefer them in the same directory. Your choice.
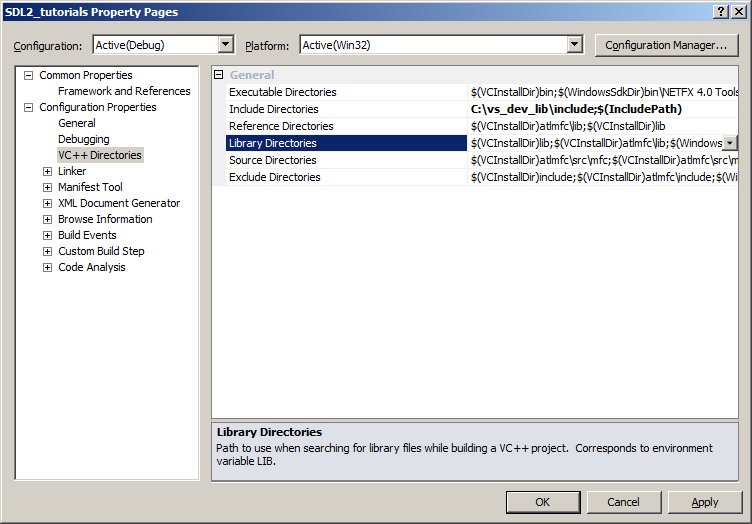
7) Next we're going to tell Visual C++ to search for library files in the SDL_image/SDL_ttf/SDL_mixer library folder we just extracted. Select the Library Directories field, click the tiny down arrow button, and click edit.
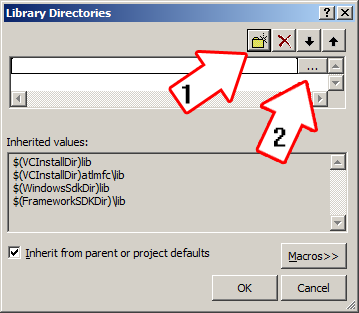
8) Click the folder icon, and then click the button that pops up.
9) Now go find the lib folder you extracted, and select the lib folder where you find two folders. There's one for 32bit x86 architecture and for 64bit x64 architecture.
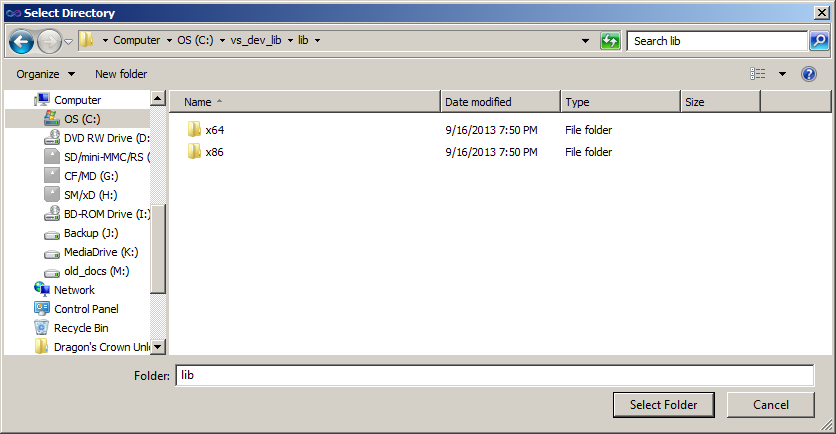
This is important: most compilers still compile 32bit binaries by default to maximize compatibility. We will be using the 32bit binaries for this tutorial set. It doesn't matter if you have a 64bit operating system, since we are compiling 32bit binaries we will be using the 32bit library. This means you need to select the x86 folder and click ok. Now Visual Studio knows where to find the library files. If you get an error how the linker can't find SDL2_image.lib/SDL2_ttf.lib/SDL2_mixer.lib, it means you missed this step.
Like before, you might notice that the lib directory is the same from tutorial 01. Again, this is because I personally like to put the library files for SDL, SDL_image, SDL_ttf, and SDL_mixer in the same directory. If you do this you can skip this step since visual studio is already looking for library files there. For you people you put them in a separate directory, you need to tell visual studio where to find the lib files.
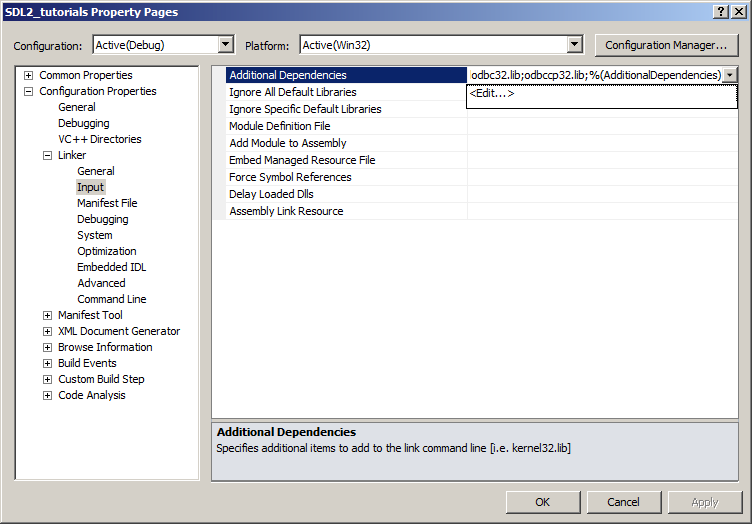
10) In order to compile SDL code, we have to tell the Visual C++ to link against the libraries. Go under Linker in the Input menu, edit the additional dependencies.
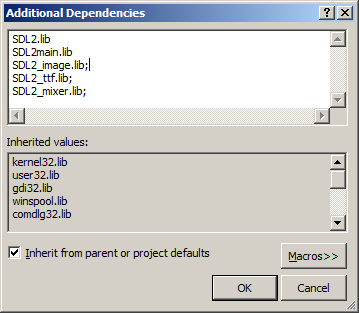
11)Now paste
into the Additional dependencies field and click OK.
 If you were linking SDL_ttf, you'd put
Now Visual Studio knows to link against the extension library. If you get a bunch of undefined reference error after compiling, it means you messed up this step.
12) Like with plain SDL, the operating system needs to be able to find the dll files for the extension library while running.
Go find the lib folder you extracted from the extension library and copy all of the dll files and put them either your project's working directory (where the vcxproj file is at), or inside of the system directory. C:\WINDOWS\SYSTEM32 is the 32bit windows system directory and C:\Windows\SysWOW64 is the 64bit system directory of 32bit applications. For these tutorials, I'm assuming we're making 32bit applications.
13) Now go download the source for lesson 06. Add the source file inside to your project.
Now build. If there are any errors, make sure you didn't skip a step.
Now that you have the extension library compiling, it's time to go onto part 2 of the tutorial.
You'll want to download the visual c++ development libraries.
2) Open the zip archive and there should be a folder that contains folders called include and another one called lib. Copy the contents of the folder and put them where you want. I recommend putting them in the same directory where you put your SDL install. For these tutorials I'm putting them in a directory I created called C:\vs_dev_lib
3) Open your SDL project and go to project properties.
4) Now we have to tell Visual C++ to search for header files in the SDL extension include folder we just extracted. Under Configuration Properties in the VC++ Directories menu, select the Include Directories field, click the tiny down arrow button, and click edit.
5) Click the folder icon, and then click the button that pops up.
6) Now go find the SDL_image (or SDL_ttf/SDL_mixer) folders you extracted, and select the include folder and click OK.
You may have noticed that the directory added here is the same from the setting up SDL tutorial. This is because I over wrote the include directory so it has both the headers from SDL 2 and SDL_image/SDL_ttf/SDL_mixer headers are in the same directory. If you did this you can skip this step because our project already knew where to find the header files. Some prefer keep their SDL and SDL extension libaries in different directories, some prefer them in the same directory. Your choice.
7) Next we're going to tell Visual C++ to search for library files in the SDL_image/SDL_ttf/SDL_mixer library folder we just extracted. Select the Library Directories field, click the tiny down arrow button, and click edit.
8) Click the folder icon, and then click the button that pops up.
9) Now go find the lib folder you extracted, and select the lib folder where you find two folders. There's one for 32bit x86 architecture and for 64bit x64 architecture.
This is important: most compilers still compile 32bit binaries by default to maximize compatibility. We will be using the 32bit binaries for this tutorial set. It doesn't matter if you have a 64bit operating system, since we are compiling 32bit binaries we will be using the 32bit library. This means you need to select the x86 folder and click ok. Now Visual Studio knows where to find the library files. If you get an error how the linker can't find SDL2_image.lib/SDL2_ttf.lib/SDL2_mixer.lib, it means you missed this step.
Like before, you might notice that the lib directory is the same from tutorial 01. Again, this is because I personally like to put the library files for SDL, SDL_image, SDL_ttf, and SDL_mixer in the same directory. If you do this you can skip this step since visual studio is already looking for library files there. For you people you put them in a separate directory, you need to tell visual studio where to find the lib files.
10) In order to compile SDL code, we have to tell the Visual C++ to link against the libraries. Go under Linker in the Input menu, edit the additional dependencies.
11)Now paste
SDL2_image.lib;into the Additional dependencies field and click OK.
SDL2_ttf.lib;. If you were linking SDL2_mixer, you'd put SDL2_mixer.lib;.Now Visual Studio knows to link against the extension library. If you get a bunch of undefined reference error after compiling, it means you messed up this step.
12) Like with plain SDL, the operating system needs to be able to find the dll files for the extension library while running.
Go find the lib folder you extracted from the extension library and copy all of the dll files and put them either your project's working directory (where the vcxproj file is at), or inside of the system directory. C:\WINDOWS\SYSTEM32 is the 32bit windows system directory and C:\Windows\SysWOW64 is the 64bit system directory of 32bit applications. For these tutorials, I'm assuming we're making 32bit applications.
13) Now go download the source for lesson 06. Add the source file inside to your project.
Now build. If there are any errors, make sure you didn't skip a step.
Now that you have the extension library compiling, it's time to go onto part 2 of the tutorial.