Scrolling
Last Updated 4/09/14
Up until now, you've been working with environments that were 640 x 480. In this lesson we're going to redo the motion tutorial only this time we're going to be able to move around an area of any size thanks to scrolling.A Scrolling tutorial with SDL 2 is now available.
When you have a game that requires scrolling, the only real difference is that there has to be a camera.
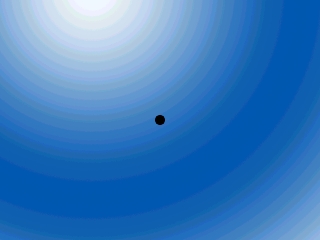
Since you can't show the entire level on the screen you have to take the part you want to see:
and cut it out and show it on the screen:
It does take some more work since you have to move the camera around to show what you want to. In this program, the camera will follow the dot we move around.
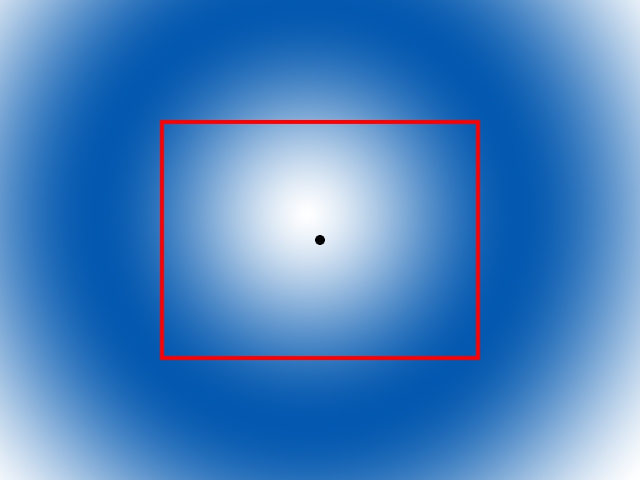
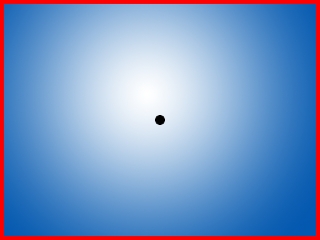
Since you can't show the entire level on the screen you have to take the part you want to see:
and cut it out and show it on the screen:
It does take some more work since you have to move the camera around to show what you want to. In this program, the camera will follow the dot we move around.
//Screen attributes
const int SCREEN_WIDTH = 640;
const int SCREEN_HEIGHT = 480;
const int SCREEN_BPP = 32;
//The frame rate
const int FRAMES_PER_SECOND = 20;
//The dot dimensions
const int DOT_WIDTH = 20;
const int DOT_HEIGHT = 20;
//The dimensions of the level
const int LEVEL_WIDTH = 1280;
const int LEVEL_HEIGHT = 960;
//The surfaces
SDL_Surface *dot = NULL;
SDL_Surface *background = NULL;
SDL_Surface *screen = NULL;
//The event structure
SDL_Event event;
//The camera
SDL_Rect camera = { 0, 0, SCREEN_WIDTH, SCREEN_HEIGHT };
Here we have our global variables.
We have our standard constants, surfaces, event structure and all that good stuff, but this time we have 2 new constants defining the level width and height. Since we can scroll, we don't confine everything inside of the screen, but now we confine the dot within a level.
As I mentioned before, we need a camera to define what part of the level we will show on the screen. Since the screen is a rectangular area, the camera is a SDL_Rect. Here we initialize the camera in the top left corner and set the width and height to be that of the screen.
//The dot
class Dot
{
private:
//The X and Y offsets of the dot
int x, y;
//The velocity of the dot
int xVel, yVel;
public:
//Initializes the variables
Dot();
//Takes key presses and adjusts the dot's velocity
void handle_input();
//Moves the dot
void move();
//Shows the dot on the screen
void show();
//Sets the camera over the dot
void set_camera();
};
Here we have the definition of the dot class.
It's pretty much the same as from previous lessons, but this time we have a function that centers the camera over the dot.
It's pretty much the same as from previous lessons, but this time we have a function that centers the camera over the dot.
void Dot::move()
{
//Move the dot left or right
x += xVel;
//If the dot went too far to the left or right
if( ( x < 0 ) || ( x + DOT_WIDTH > LEVEL_WIDTH ) )
{
//move back
x -= xVel;
}
//Move the dot up or down
y += yVel;
//If the dot went too far up or down
if( ( y < 0 ) || ( y + DOT_HEIGHT > LEVEL_HEIGHT ) )
{
//move back
y -= yVel;
}
}
The move function is pretty much the same but there is one key difference.
We no longer keep the dot inside the screen, but now keep it inside of the boundaries of the level.
void Dot::set_camera()
{
//Center the camera over the dot
camera.x = ( x + DOT_WIDTH / 2 ) - SCREEN_WIDTH / 2;
camera.y = ( y + DOT_HEIGHT / 2 ) - SCREEN_HEIGHT / 2;
//Keep the camera in bounds.
if( camera.x < 0 )
{
camera.x = 0;
}
if( camera.y < 0 )
{
camera.y = 0;
}
if( camera.x > LEVEL_WIDTH - camera.w )
{
camera.x = LEVEL_WIDTH - camera.w;
}
if( camera.y > LEVEL_HEIGHT - camera.h )
{
camera.y = LEVEL_HEIGHT - camera.h;
}
}
When we set the camera, we first center it over the dot.
Since we don't want to show anything outside of the level, we have to keep the camera in bounds after we center it over the dot.
We check if the camera is inside the level, and if any part of it is outside the level, we push it back inside.
Since we don't want to show anything outside of the level, we have to keep the camera in bounds after we center it over the dot.
We check if the camera is inside the level, and if any part of it is outside the level, we push it back inside.
void Dot::show()
{
//Show the dot
apply_surface( x - camera.x, y - camera.y, dot, screen );
}
The show function now blits the dot on the screen relative to the camera to make sure it matches up with the background.
//While the user hasn't quit
while( quit == false )
{
//Start the frame timer
fps.start();
//While there's events to handle
while( SDL_PollEvent( &event ) )
{
//Handle events for the dot
myDot.handle_input();
//If the user has Xed out the window
if( event.type == SDL_QUIT )
{
//Quit the program
quit = true;
}
}
//Move the dot
myDot.move();
//Set the camera
myDot.set_camera();
//Show the background
apply_surface( 0, 0, background, screen, &camera );
//Show the dot on the screen
myDot.show();
//Update the screen
if( SDL_Flip( screen ) == -1 )
{
return 1;
}
//Cap the frame rate
if( fps.get_ticks() < 1000 / FRAMES_PER_SECOND )
{
SDL_Delay( ( 1000 / FRAMES_PER_SECOND ) - fps.get_ticks() );
}
}
Now here's the program's main loop.
We handle events, move the dot, set the camera, apply the part of the background inside of the camera, show the dot, update the screen and cap the frame rate.
We handle events, move the dot, set the camera, apply the part of the background inside of the camera, show the dot, update the screen and cap the frame rate.