
Bitmap Fonts
Last Updated: May 28th, 2024
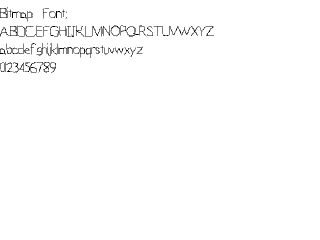
Sometimes TTF fonts aren't flexible enough. Since rendering text is just rendering images of characters, we can use bitmap fonts to render text.//Texture wrapper class
class LTexture
{
public:
//Initializes variables
LTexture();
//Deallocates memory
~LTexture();
//Loads image at specified path
bool loadFromFile( std::string path );
//Loads image into pixel buffer
bool loadPixelsFromFile( std::string path );
//Creates image from preloaded pixels
bool loadFromPixels();
#if defined(SDL_TTF_MAJOR_VERSION)
//Creates image from font string
bool loadFromRenderedText( std::string textureText, SDL_Color textColor );
#endif
//Deallocates texture
void free();
//Set color modulation
void setColor( Uint8 red, Uint8 green, Uint8 blue );
//Set blending
void setBlendMode( SDL_BlendMode blending );
//Set alpha modulation
void setAlpha( Uint8 alpha );
//Renders texture at given point
void render( int x, int y, SDL_Rect* clip = NULL, double angle = 0.0, SDL_Point* center = NULL, SDL_RendererFlip flip = SDL_FLIP_NONE );
//Gets image dimensions
int getWidth();
int getHeight();
//Pixel accessors
Uint32* getPixels32();
Uint32 getPixel32( Uint32 x, Uint32 y );
Uint32 getPitch32();
Uint32 mapRGBA( Uint8 r, Uint8 g, Uint8 b, Uint8 a );
private:
//The actual hardware texture
SDL_Texture* mTexture;
//Surface pixels
SDL_Surface* mSurfacePixels;
//Image dimensions
int mWidth;
int mHeight;
};
In previous tutorials when we did texture pixel manipulation, we didn't care which pixel we got since we wanted to grab all the pixels. Here we need to get pixels at exact
x/y coordinates which is why we're adding a getPixel32 function. This function works specifically for 32bit pixels.
//Our bitmap font
class LBitmapFont
{
    public:
        //The default constructor
        LBitmapFont();

        //Generates the font
        bool buildFont( std::string path );

        //Deallocates font
        void free();

        //Shows the text
        void renderText( int x, int y, std::string text );

    private:
        //The font texture
        LTexture mFontTexture;

        //The individual characters in the surface
        SDL_Rect mChars[ 256 ];

        //Spacing Variables
        int mNewLine, mSpace;
};
Here is our bitmap font which functions as a wrapper for a sprite sheet of glyphs. It has a constructor to initialize internal variables, a function to build the font, and a function to render the text.
When the bitmap font is built we go through the texture and find all the character sprites for the 256 characters (that are stored in the mChars array) and calculate the distance for a new line and a space.
When the bitmap font is built we go through the texture and find all the character sprites for the 256 characters (that are stored in the mChars array) and calculate the distance for a new line and a space.
Uint32 LTexture::getPixel32( Uint32 x, Uint32 y )
{
    //Convert the pixels to 32 bit
    Uint32* pixels = static_cast( mSurfacePixels->pixels );

    //Get the pixel requested
    return pixels[ ( y * getPitch32() ) + x ];
}
Here is our function to get a pixel at a specific offset.
The important thing to know is that even though we have a 2 dimensional texture image like this: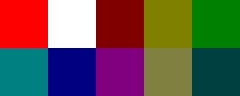
Pixels are stored in one dimension like this:
So if you wanted to get the blue pixel in row 1, column 1 (the first row/column is row/column 0), you would have to calculate the offset like this:
Which comes out to:
And as you can see, the pixel at index 6 on the 1 dimensional pixels is the same as the one on row 1 column 1 on the 2 dimensional pixels.
The important thing to know is that even though we have a 2 dimensional texture image like this:
Pixels are stored in one dimension like this:
So if you wanted to get the blue pixel in row 1, column 1 (the first row/column is row/column 0), you would have to calculate the offset like this:
Y Offset * Pitch + X OffsetWhich comes out to:
1 * 5 + 1 = 6And as you can see, the pixel at index 6 on the 1 dimensional pixels is the same as the one on row 1 column 1 on the 2 dimensional pixels.
LBitmapFont::LBitmapFont()
{
    //Initialize variables
    mNewLine = 0;
    mSpace = 0;
}
Here in the constructor we initialize the internals.
bool LBitmapFont::buildFont( std::string path )
{
    //Get rid of preexisting texture
    free();

    //Load bitmap image
    bool success = true;
    if( !mFontTexture.loadPixelsFromFile( path ) )
    {
        printf( "Unable to load bitmap font surface!\n" );
        success = false;
    }
Now we're entering the function that's going to go through the bitmap font and define all the clip rectangles for all the sprites. To do that we'll have to load the bitmap font pixels.
        //Get the background color
        Uint32 bgColor = mFontTexture.getPixel32( 0, 0 );

        //Set the cell dimensions
        int cellW = mFontTexture.getWidth() / 16;
        int cellH = mFontTexture.getHeight() / 16;

        //New line variables
        int top = cellH;
        int baseA = cellH;

        //The current character we're setting
        int currentChar = 0;
In order for this bitmap font loading to work, the character glyphs need to be arranged in cells:
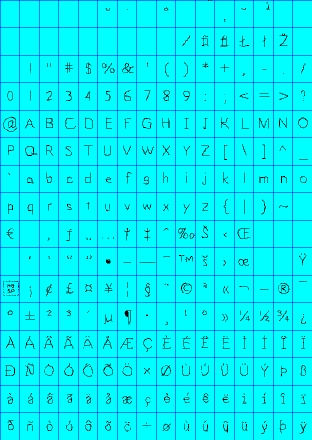
The cells all need to all have the same width and height, arranged in 16 columns and 16 rows, and need to be in ASCII order. The bitmap font loader is going to go through each of the cells, find the sides of the glyph sprites and set the clip rectangle for the sprite.
First we get the background color which we'll need to find the edges of the glyph sprites. Then we calculate the cell width and height. We have the variable called top which we will keep track of the top of the tallest glyph in the sprite sheet. The variable baseA will keep track of the offset of the bottom of the capital A glyph which will use as a base line for rendering characters.
Lastly we have the currentChar which keeps track of the current character glyph we're looking for.
        //Go through the cell rows
        for( int rows = 0; rows < 16; ++rows )
        {
            //Go through the cell columns
            for( int cols = 0; cols < 16; ++cols )
            {
                //Set the character offset
                mChars[ currentChar ].x = cellW * cols;
                mChars[ currentChar ].y = cellH * rows;

                //Set the dimensions of the character
                mChars[ currentChar ].w = cellW;
                mChars[ currentChar ].h = cellH;
These two nested for loops are for going through the cell rows/columns.
At the top of per cell loop, we initialize the glyph sprite positon at the top of the cell and the sprite dimensions to be the cell dimensions. This means by default the glyph sprite is the full cell.
At the top of per cell loop, we initialize the glyph sprite positon at the top of the cell and the sprite dimensions to be the cell dimensions. This means by default the glyph sprite is the full cell.
                //Find Left Side
                //Go through pixel columns
                for( int pCol = 0; pCol < cellW; ++pCol )
                {
                    //Go through pixel rows
                    for( int pRow = 0; pRow < cellH; ++pRow )
                    {
                        //Get the pixel offsets
                        int pX = ( cellW * cols ) + pCol;
                        int pY = ( cellH * rows ) + pRow;

                        //If a non colorkey pixel is found
                        if( mFontTexture.getPixel32( pX, pY ) != bgColor )
                        {
                            //Set the x offset
                            mChars[ currentChar ].x = pX;

                            //Break the loops
                            pCol = cellW;
                            pRow = cellH;
                        }
                    }
                }
For each cell we need to go through all the pixels in the cell to find the edge of the glyph sprite. In this loop we go through each column from top to bottom and look for the first pixel that is not the background color. Once
we find a pixel that is not the background color it means we found the left edge of the sprite:
When we find the left side of the glyph we set it as x position of the sprite and then break the loops.
When we find the left side of the glyph we set it as x position of the sprite and then break the loops.
                //Find Right Side
                //Go through pixel columns
                for( int pColW = cellW - 1; pColW >= 0; --pColW )
                {
                    //Go through pixel rows
                    for( int pRowW = 0; pRowW < cellH; ++pRowW )
                    {
                        //Get the pixel offsets
                        int pX = ( cellW * cols ) + pColW;
                        int pY = ( cellH * rows ) + pRowW;

                        //If a non colorkey pixel is found
                        if( bitmap->getPixel32( pX, pY ) != bgColor )
                        {
                            //Set the width
                            mChars[ currentChar ].w = ( pX - mChars[ currentChar ].x ) + 1;

                            //Break the loops
                            pColW = -1;
                            pRowW = cellH;
                        }
                    }
                }
Here we're looking for the pixel on the right side. It works pretty much the same as finding the left side, only now we're moving from right to left instead of left to right.
When we find the right pixel, we use it to set the width. Since the pixel array starts at 0, we need to add 1 to the width.
When we find the right pixel, we use it to set the width. Since the pixel array starts at 0, we need to add 1 to the width.
                //Find Top
                //Go through pixel rows
                for( int pRow = 0; pRow < cellH; ++pRow )
                {
                    //Go through pixel columns
                    for( int pCol = 0; pCol < cellW; ++pCol )
                    {
                        //Get the pixel offsets
                        int pX = ( cellW * cols ) + pCol;
                        int pY = ( cellH * rows ) + pRow;

                        //If a non colorkey pixel is found
                        if( mFontTexture.getPixel32( pX, pY ) != bgColor )
                        {
                            //If new top is found
                            if( pRow < top )
                            {
                                top = pRow;
                            }

                            //Break the loops
                            pCol = cellW;
                            pRow = cellH;
                        }
                    }
                }
Here is the code to find the top of the sprite. When we find a top that is higher than the current highest top, we set it as the new top.
Note that since the y axis is inverted, the highest top actually has the lowest y offset.
Note that since the y axis is inverted, the highest top actually has the lowest y offset.
                //Find Bottom of A
                if( currentChar == 'A' )
                {
                    //Go through pixel rows
                    for( int pRow = cellH - 1; pRow >= 0; --pRow )
                    {
                        //Go through pixel columns
                        for( int pCol = 0; pCol < cellW; ++pCol )
                        {
                            //Get the pixel offsets
                            int pX = ( cellW * cols ) + pCol;
                            int pY = ( cellH * rows ) + pRow;

                            //If a non colorkey pixel is found
                            if( mFontTexture.getPixel32( pX, pY ) != bgColor )
                            {
                                //Bottom of a is found
                                baseA = pRow;

                                //Break the loops
                                pCol = cellW;
                                pRow = -1;
                            }
                        }
                    }
                }

                //Go to the next character
                ++currentChar;
            }
        }
In terms of looking for the bottom of the glyphs, the only one we care about is the capital A. For this bitmap font builder we're going to use the bottom of the A glyph sprite as the base line so characters like
"g", "j", "y", etc that hang below the baseline don't define the bottom. You don't have to do it this way, but it's given me good results before.
        //Calculate space
        mSpace = cellW / 2;

        //Calculate new line
        mNewLine = baseA - top;

        //Lop off excess top pixels
        for( int i = 0; i < 256; ++i )
        {
            mChars[ i ].y += top;
            mChars[ i ].h -= top;
        }

        //Create final texture
        if( !mFontTexture.loadFromPixels() )
        {
            printf( "Unable to create font texture!\n" );
            success = false;
        }
    }

    return success;
}
After we're done defining all the sprites, we have some post processing to do. First we calculate how long a space is. Here we're defining it as half a cell width. We then calculate the height of a new line by using the
baseline and the highest sprite top.
We then lop off the extra space at the top of each glyph to prevent there from being too much space between lines. Finally we finish loading the texture for the bitmap font.
Now the way we constructed the bitmap font isn't the only way to do it. You can define spaces, new lines, and base lines another way. You use an XML/JSON/YML file to define the positions of the sprites instead of using cells. I decided to go with this method because it's a common one and it has worked for me.
void LBitmapFont::renderText( int x, int y, std::string text )
{
    //If the font has been built
    if( mFontTexture.getWidth() > 0 )
    {
        //Temp offsets
        int curX = x, curY = y;
Now that we have all the glyph sprites defined, it's time to render them to the screen. First we check that there is a bitmap to render with (which should be at least one pixel wide), then we declare x/y offsets that we'll
be using to render the current glyph sprite.
        //Go through the text
        for( int i = 0; i < text.length(); ++i )
        {
            //If the current character is a space
            if( text[ i ] == ' ' )
            {
                //Move over
                curX += mSpace;
            }
            //If the current character is a newline
            else if( text[ i ] == '\n' )
            {
                //Move down
                curY += mNewLine;

                //Move back
                curX = x;
            }
Here is the for loop that goes through the string to render each glyph sprite. However there are two ASCII values we're not actually going to render anything for. When we have a space, all we have to do is move over the space
width. When we have a new line we move down a new line and back to the base x offset.
            else
            {
                //Get the ASCII value of the character
                int ascii = (unsigned char)text[ i ];

                //Show the character
                mBitmap->render( curX, curY, &mChars[ ascii ] );

                //Move over the width of the character with one pixel of padding
                curX += mChars[ ascii ].w + 1;
            }
        }
    }
}
For nonspecial characters, we render the sprite. As you can see, it's as simple as getting the ASCII value, rendering the sprite associated with the ASCII value and then moving over the width of the sprite.
The for loop will then keep going through all the characters and rendering the sprite for each of them one after the other.
The for loop will then keep going through all the characters and rendering the sprite for each of them one after the other.