
State Machines
Last Updated: Jul 29th, 2022
It's important to know how to move between the various modes of a game. State machines allow you to do just that.
Let me start off by saying this is a huge article. The source code for the demo program is over 1500 lines of code. We use motion, collision detection and scrolling so make sure you know do how to these things. You'll also
need a good understanding of game loops. State machines are all about changing how your game loop functions.
You're also going to have to know inheritance and polymorphism. If you're not familiar these concepts in C++ I recommend you learn them. Besides needing them for this article, encapsulation, inheritance, and polymorphism are the key concepts of object oriented programming. If you ever want to use C++ effectively, you're going to have to learn them eventually. We'll also be going over static class variables and functions. Now on with the lesson.
Say you have various modes in your game like a title screen, menus, and the levels of your game. For each of those modes the events, logic, and rendering work differently. To change the way your game loop works, we use a state machine to transition between the different states.
The particular type of state machine used here is called a finite state machine. There's two common ways to implement this type of state machine.
//Do logic
switch( gameState )
{
    case STATE_INTRO:
    intro_logic();
    break;

    case STATE_TITLE:
    title_logic();
    break;

    case STATE_OVERWORLD:
    overworld_logic();
    break;
}
Here's what a state machine's logic module would look like if it was used implementing the switch/case method. As you can see, the behavior varies depending on the current game state.
Then there's the object oriented method.
Then there's the object oriented method.
//Run main loop
while( quit == false )
{
    //Do events
    currentState->events();

    //Do logic
    currentState->logic();

    //Change state if needed
    change_state();

    //Render
    currentState->render();
}
Here's what the object oriented method would look like.
Now with the object oriented method, we create a base game state class with virtual functions for each part of the game loop. Then we have game state classes that inherit from the base class and override the functions to work as the game state needs them to. To switch the game state, we simply change the game state object as needed.
In our demonstration, we use the object oriented method as opposed to the switch/case method. Why, you ask?
while ( quit == false )
{
    //Do events
    switch( gameState )
    {
        case STATE_INTRO:
        intro_events();
        break;

        case STATE_TITLE:
        title_events();
        break;

        case STATE_MENU:
        menu_events();
        break;

        case STATE_STAGE01:
        stage01_events();
        break;

        case STATE_STAGE02:
        stage02_events();
        break;

        case STATE_STAGE03:
        stage03_events();
        break;

        case STATE_STAGE04:
        stage04_events();
        break;

        case STATE_STAGE05:
        stage05_events();
        break;

        case STATE_BONUS_STAGE:
        bonus_stage_events();
        break;
    }

    //Do logic
    switch( gameState )
    {
        case STATE_INTRO:
        intro_logic();
        break;

        case STATE_TITLE:
        title_logic();
        break;

        case STATE_MENU:
        menu_logic();
        break;

        case STATE_STAGE01:
        stage01_logic();
        break;

        case STATE_STAGE02:
        stage02_logic();
        break;

        case STATE_STAGE03:
        stage03_logic();
        break;

        case STATE_STAGE04:
        stage04_logic();
        break;

        case STATE_STAGE05:
        stage05_logic();
        break;

        case STATE_BONUS_STAGE:
        bonus_stage_logic();
        break;
    }

    //Change the state if needed
    change_state();

    //Do Rendering
    switch( gameState )
    {
        case STATE_INTRO:
        intro_render();
        break;

        case STATE_TITLE:
        title_render();
        break;

        case STATE_MENU:
        menu_render();
        break;

        case STATE_STAGE01:
        stage01_render();
        break;

        case STATE_STAGE02:
        stage02_render();
        break;

        case STATE_STAGE03:
        stage03_render();
        break;

        case STATE_STAGE04:
        stage04_render();
        break;

        case STATE_STAGE05:
        stage05_render();
        break;

        case STATE_BONUS_STAGE:
        bonus_stage_render();
        break;
    }
}
The problem with the switch/case method is that it can get cluttered pretty quickly. There's only 9 states represented here and just look how many lines of code there are. It's also a pain having to keep track of all
those case statements.
With the object oriented method in our demo, the state manager only needs 3 lines more of code per state compared to the 9 the switch/case method would need. So it's best to keep the switch/case method to small scale stuff like changing a sprite's animation.
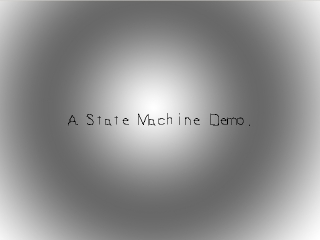
So let's get started with our state machine demo.
With the object oriented method in our demo, the state manager only needs 3 lines more of code per state compared to the 9 the switch/case method would need. So it's best to keep the switch/case method to small scale stuff like changing a sprite's animation.
So let's get started with our state machine demo.
Let's start out with a flyover for the various states in our application.
The exit state is used when the user wants to quit the program. Setting the state to exit is like setting quit to true in our other applications.
The NULL state is used when we want to say that there is no state we want to change to. You'll see it in action in the changeState() function later on.
First we have the intro screen. It's the state we start in.

Then when the user presses a key we move to the title screen.
When the user presses a key again we move to the overworld.
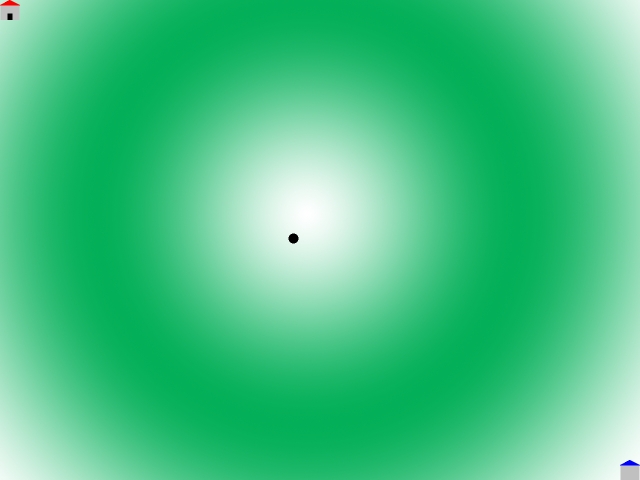
When the user moves the dot over the red house in the upper left corner, we move into the red room.
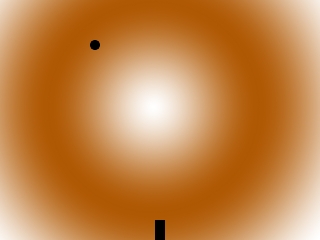
When they go through the door, they go back to the overworld.
When they go through the door, they go back to the overworld.
When the user moves the dot over the blue house in the bottom right corner of the overworld,
we move into the blue room.
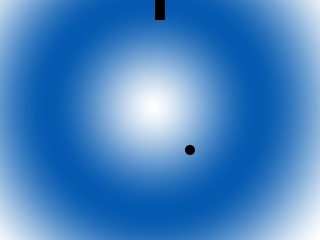
We they go through the door, they go back to the overworld just like with the red room.
We they go through the door, they go back to the overworld just like with the red room.
The exit state is used when the user wants to quit the program. Setting the state to exit is like setting quit to true in our other applications.
The NULL state is used when we want to say that there is no state we want to change to. You'll see it in action in the changeState() function later on.
//Game state base class
class GameState
{
public:
    //State transitions
    virtual bool enter() = 0;
    virtual bool exit() = 0;

    //Main loop functions
    virtual void handleEvent( SDL_Event& e ) = 0;
    virtual void update() = 0;
    virtual void render() = 0;

    //Make sure to call child destructors
    virtual ~GameState(){};
};
Here's the base class for all our game state classes. You can see we have virtual functions for each part of a game loop and a virtual destructor. There's also functions for when we enter or exit a state.
//State managers
void setNextState( GameState* nextState );
void changeState();
Here are our functions for managing our game state. setNextState() is used to mark our state machine for state transition and change state calls the state exit/enter functions and does the actual state change.
//Global assets
LTexture gDotTexture;
TTF_Font* gFont = NULL;

//Global game objects
Dot gDot;

//Game state object
GameState* gCurrentState = NULL;
GameState* gNextState = NULL;
Here are some objects we're going to be using across multiple states and we'll managing globally. First we have the global media assets with the dot texture and font. We have a dot that we'll be keeping between game states.
Finally, we have a pointer to the current active game state and a pointer to the next game state.
You may be thinking as to why we don't put the state management and the state variables into a state manager class. This is how it is usually done, but for the sake of simplicity we'll have them be global variables/functions. In larger games, it's not uncommon for game states to have substates and state machines to have substate machines, but for this article we want to keep things simple.
You may be thinking as to why we don't put the state management and the state variables into a state manager class. This is how it is usually done, but for the sake of simplicity we'll have them be global variables/functions. In larger games, it's not uncommon for game states to have substates and state machines to have substate machines, but for this article we want to keep things simple.
bool loadMedia()
{
    //Loading success flag
    bool success = true;

    //Load dot texture
    if( !gDotTexture.loadFromFile( "06_state_machines/dot.bmp" ) )
    {
        printf( "Failed to load dot texture! SDL Error: %s\n", SDL_GetError() );
        success = false;
    }

    //Open the font
    gFont = TTF_OpenFont( "06_state_machines/lazy.ttf", 28 );
    if( gFont == NULL )
    {
        printf( "Failed to load lazy font! SDL_ttf Error: %s\n", TTF_GetError() );
        success = false;
    }

    return success;
}
Here we're loading the global assets we'll be using across multiple game states. This function is called after initialization of the libraries but before we enter the first game state.
class IntroState : public GameState
{
public:
    //Static accessor
    static IntroState* get();

    //Transitions
    bool enter();
    bool exit();

    //Main loop functions
    void handleEvent( SDL_Event& e );
    void update();
    void render();

private:
    //Static instance
    static IntroState sIntroState;

    //Private constructor
    IntroState();

    //Intro background
    LTexture mBackgroundTexture;

    //Intro message
    LTexture mMessageTexture;
};


class TitleState : public GameState
{
public:
    //Static accessor
    static TitleState* get();

    //Transitions
    bool enter();
    bool exit();

    //Main loop functions
    void handleEvent( SDL_Event& e );
    void update();
    void render();

private:
    //Static instance
    static TitleState sTitleState;

    //Private constructor
    TitleState();

    //Intro background
    LTexture mBackgroundTexture;

    //Intro message
    LTexture mMessageTexture;
};
Here are the class declarations for the intro and title screen states which inherit from the GameState class. They both just show a message on a background.
They have their transition and game loop functions as mentioned before. What might be new is the static function and variable. That's because this is a singleton class.
For those of you unfamiliar with static variables, think of them as variables that are global to the class. We also have a private constructor which prevents us from instantiating objects from the class. Combined this makes sure we only have one IntroState. The static get() function allows us to access the static state object. This is kind of a roundabout way to create what is functionally a global variable, but this is how I've done it games I have worked on. Global variables become problematic in large scale projects and encapsulating them as static variables makes them more manageable.
Some of you may be saying that singletons are also problematic. That's because they are and you should generally avoid using them if possible. However, in cases where you definitely sure that you only want one instance of them (like in asset managers), they're fine to use.
IntroState* IntroState::get()
{
    //Get static instance
    return &sIntroState;
}

bool IntroState::enter()
{
    //Loading success flag
    bool success = true;

    //Load background
    if( !mBackgroundTexture.loadFromFile( "06_state_machines/introbg.png" ) )
    {
        printf( "Failed to intro background!\n" );
        success = false;
    }

    //Load text
    SDL_Color textColor = { 0x00, 0x00, 0x00, 0xFF };
    if( !mMessageTexture.loadFromRenderedText( "Lazy Foo' Productions Presents...", textColor ) )
    {
        printf( "Failed to render intro text!\n" );
        success = false;
    }

    return success;
}

bool IntroState::exit()
{
    //Free background and text
    mBackgroundTexture.free();
    mMessageTexture.free();

    return true;
}
The intro enter() and exit() functions do basic asset loading/freeing as you would expect for a simple game state that just displays some assets.
The static get() function just returns our static variable but it will make more sense once we see it in action.
The static get() function just returns our static variable but it will make more sense once we see it in action.
void IntroState::handleEvent( SDL_Event& e )
{
    //If the user pressed enter
    if( ( e.type == SDL_KEYDOWN ) && ( e.key.keysym.sym == SDLK_RETURN ) )
    {
        //Move onto title state
        setNextState( TitleState::get() );
    }
}

void IntroState::update()
{

}

void IntroState::render()
{
    //Show the background
    mBackgroundTexture.render( 0, 0 );

    //Show the message
    mMessageTexture.render( ( SCREEN_WIDTH - mMessageTexture.getWidth() ) / 2, ( SCREEN_HEIGHT - mMessageTexture.getHeight() ) / 2 );
}
Here is our very basic intro state game loop function that just renders some textures. The only interesting part is the fact that it calls for state transition when return is pressed.
You're probably wondering how setNextState() works. Well then let's take a look.
You're probably wondering how setNextState() works. Well then let's take a look.
void setNextState( GameState* newState )
{
    //If the user doesn't want to exit
    if( gNextState != ExitState::get() )
    {
        //Set the next state
        gNextState = newState;
    }
}
All setNextState() does is set the "gNextState" variable.
Remember that a good game loop is modular so we can't be changing game state objects all over the place. All the actual game state object changing happens in the changeState() function (which we'll get to in a little bit). So we use setNextState() to request what state we want to change to.
You might be asking yourself why we check if the user wants to exit. It can happen where there's two or more requests to change states before getting to the changeState() function.
Say if the user tries to x out in the events module and "gNextState" gets set to the exit state and then dot moves over the red house in the logic module and "nextState" gets set to the red state. This means the request to exit the application will be ignored.
But since the function checks if the user wanted to exit before changing the next state, the user quit will always go through.
//Declare static instance
IntroState IntroState::sIntroState;

IntroState::IntroState()
{
    //No public instantiation
}
An important note about static variables is that unlike other class variables they declared outside the class definition to instantiate them.
The class constructor doesn't do anything other than be private. Our enter()/exit() function basically do the job of constructor/destructor.
The class constructor doesn't do anything other than be private. Our enter()/exit() function basically do the job of constructor/destructor.
            //Set the current game state object
            gCurrentState = IntroState::get();
            gCurrentState->enter();

            //While the user hasn't quit
            while( gCurrentState != ExitState::get() )
            {
                //Do state event handling
                while( SDL_PollEvent( &e ) != 0 )
                {
                    //Handle state events
                    gCurrentState->handleEvent( e );

                    //Exit on quit
                    if( e.type == SDL_QUIT )
                    {
                        setNextState( ExitState::get() );
                    }
                }

                //Do state logic
                gCurrentState->update();

                //Change state if needed
                changeState();

                //Clear screen
                SDL_SetRenderDrawColor( gRenderer, 0xFF, 0xFF, 0xFF, 0xFF );
                SDL_RenderClear( gRenderer );

                //Do state rendering
                gCurrentState->render();

                //Update screen
                SDL_RenderPresent( gRenderer );
            }
Before we enter the main loop, we get the intro state pointer using static function. Because the function belongs to the class and the static instance belongs to the class, we can call this function directly from the class.
Once we have the pointer to the static into state, we transition into it by calling its enter function. Once we're transitioned, we start the main loop.
In the main loop, you see the standard event, logic and rendering modules. Changing of the game state object happens at the end of the logic module after we call the game state object's update() function.
Also notice that changeState() is called before the rendering module. Remember that because it's important when we look next at how changeState() works.
void changeState()
{
    //If the state needs to be changed
    if( gNextState != NULL )
    {
        gCurrentState->exit();
        gNextState->enter();

        //Change the current state ID
        gCurrentState = gNextState;
        gNextState = NULL;
    }
}
First thing we do is check if "gNextState" is not NULL. If it is NULL, it means that there's no state to change to and changeState() doesn't do anything.
If we need to change the state we exit the current state, enter the next state, and lastly rotate the state machine pointers. Remember that the pointers aren't rotated until after the transition, it will be important later.
If we need to change the state we exit the current state, enter the next state, and lastly rotate the state machine pointers. Remember that the pointers aren't rotated until after the transition, it will be important later.
void TitleState::handleEvent( SDL_Event& e )
{
    //If the user pressed enter
    if( ( e.type == SDL_KEYDOWN ) && ( e.key.keysym.sym == SDLK_RETURN ) )
    {
        //Move to overworld
        setNextState( OverWorldState::get() );
    }
}
The title state is basically the same functionally because it too shows a text with a background. The key difference is that this state transitions to the overworld.
//The dot that will move around on the screen
class Dot
{
public:
    //The dimensions of the dot
    static const int DOT_WIDTH = 20;
    static const int DOT_HEIGHT = 20;

    //Maximum axis velocity of the dot
    static const int DOT_VEL = 10;

    //Initializes the variables
    Dot();

    //Set dot position
    void set( int x, int y );

    //Takes key presses and adjusts the dot's velocity
    void handleEvent( SDL_Event& e );

    //Moves the dot
    void move( int levelWidth, int levelHeight );

    //Shows the dot on the screen relative to the camera
    void render( SDL_Rect camera );

    //Gets the collision box
    SDL_Rect getCollider();

private:
    //Got collision box
    SDL_Rect mBox;

    //The velocity of the dot
    int mVelX, mVelY;
};
Here's our friend the Dot class we modified for our state machine demo to basically be a hybrid of the dot from the scrolling tutorial and the dot from the collision detection tutorial.
The key difference is that this dot has a set() function to place it where we want it at the beginning of the state.
The key difference is that this dot has a set() function to place it where we want it at the beginning of the state.
class OverWorldState : public GameState
{
public:
    //Static accessor
    static OverWorldState* get();

    //Transitions
    bool enter();
    bool exit();

    //Main loop functions
    void handleEvent( SDL_Event& e );
    void update();
    void render();

private:
    //Level dimensions
    const static int LEVEL_WIDTH = SCREEN_WIDTH * 2;
    const static int LEVEL_HEIGHT = SCREEN_HEIGHT * 2;

    //Static instance
    static OverWorldState sOverWorldState;

    //Private constructor
    OverWorldState();

    //Overworld textures
    LTexture mBackgroundTexture;
    LTexture mRedHouseTexture;
    LTexture mBlueHouseTexture;

    //Game objects
    House mRedHouse;
    House mBlueHouse;
};
Here's the breakdown of the overworld game state.
Along with our standard state machine functions we have some texture assets we need for this state and some game objects we need for the state.
Along with our standard state machine functions we have some texture assets we need for this state and some game objects we need for the state.
bool OverWorldState::enter()
{
    //Loading success flag
    bool success = true;

    //Load background
    if( !mBackgroundTexture.loadFromFile( "06_state_machines/greenoverworld.png" ) )
    {
        printf( "Failed to load overworld background!\n" );
        success = false;
    }

    //Load house texture
    if( !mBlueHouseTexture.loadFromFile( "06_state_machines/blue.bmp" ) )
    {
        printf( "Failed to load blue house texture!\n" );
        success = false;
    }

    //Load house texture
    if( !mRedHouseTexture.loadFromFile( "06_state_machines/red.bmp" ) )
    {
        printf( "Failed to load red house texture!\n" );
        success = false;
    }

    //Position houses with graphics
    mRedHouse.set( 0, 0, &mRedHouseTexture );
    mBlueHouse.set( LEVEL_WIDTH - House::HOUSE_WIDTH, LEVEL_HEIGHT - House::HOUSE_HEIGHT, &mBlueHouseTexture );
First thing we do in the overworld entry is load the assets, then place the houses and pass in their images.
    //Came from red room state
    if( gCurrentState == RedRoomState::get() )
    {
        //Position below red house
        gDot.set( mRedHouse.getCollider().x + ( House::HOUSE_WIDTH - Dot::DOT_WIDTH ) / 2, mRedHouse.getCollider().y + mRedHouse.getCollider().h + Dot::DOT_HEIGHT );
    }
    //Came from blue room state
    else if( gCurrentState == BlueRoomState::get() )
    {
        //Position above blue house
        gDot.set( mBlueHouse.getCollider().x + ( House::HOUSE_WIDTH - Dot::DOT_WIDTH ) / 2, mBlueHouse.getCollider().y - Dot::DOT_HEIGHT * 2 );
    }
    //Came from other state
    else
    {
        //Position middle of overworld
        gDot.set( ( LEVEL_WIDTH - Dot::DOT_WIDTH ) / 2, ( LEVEL_HEIGHT - Dot::DOT_HEIGHT ) / 2 );
    }

    return success;
}
After we're done loading, it's time to set the dot depending on what the previous state was. We know what the previous state is because we do not rotate the state pointers until after the enter()/exit() functions
are called.
If the dot just came out of the red room, we place it in front of the door of the red house. If it came out of the blue house, we place it behind the blue house. If it came from any other state (like the title screen) we put the dot in the center of the overworld.
If the dot just came out of the red room, we place it in front of the door of the red house. If it came out of the blue house, we place it behind the blue house. If it came from any other state (like the title screen) we put the dot in the center of the overworld.
bool OverWorldState::exit()
{
    //Free textures
    mBackgroundTexture.free();
    mRedHouseTexture.free();
    mBlueHouseTexture.free();

    return true;
}
Like with the intro and title screens, we free our resources in the exit() function.
void OverWorldState::handleEvent( SDL_Event& e )
{
    //Handle dot input
    gDot.handleEvent( e );
}

void OverWorldState::update()
{
    //Move dot
    gDot.move( LEVEL_WIDTH, LEVEL_HEIGHT );

    //On red room collision
    if( checkCollision( gDot.getCollider(), mRedHouse.getCollider() ) )
    {
        //Got to red room
        setNextState( RedRoomState::get() );
    }
    //On blue room collision
    else if( checkCollision( gDot.getCollider(), mBlueHouse.getCollider() ) )
    {
        //Go to blue room
        setNextState( BlueRoomState::get() );
    }
}

void OverWorldState::render()
{
    //Center the camera over the dot
    SDL_Rect camera =
    {
        ( gDot.getCollider().x + Dot::DOT_WIDTH / 2 ) - SCREEN_WIDTH / 2,
        ( gDot.getCollider().y + Dot::DOT_HEIGHT / 2 ) - SCREEN_HEIGHT / 2,
        SCREEN_WIDTH,
        SCREEN_HEIGHT
    };

    //Keep the camera in bounds
    if( camera.x < 0 )
    {
        camera.x = 0;
    }
    if( camera.y < 0 )
    {
        camera.y = 0;
    }
    if( camera.x > LEVEL_WIDTH - camera.w )
    {
        camera.x = LEVEL_WIDTH - camera.w;
    }
    if( camera.y > LEVEL_HEIGHT - camera.h )
    {
        camera.y = LEVEL_HEIGHT - camera.h;
    }

    //Render background
    mBackgroundTexture.render( 0, 0, &camera );

    //Render objects
    mRedHouse.render( camera );
    mBlueHouse.render( camera );
    gDot.render( camera );
}
Here are the over world game loop functions.
The event handling function handles input for the dot. The update function moves the dot and handles collisions with state transitions. As you would expect, colliding with the red house takes you to the red room and touching the blue house takes you to the blue room.
The render function adjusts the camera and renders the background and game objects.
class RedRoomState : public GameState
{
public:
    //Static accessor
    static RedRoomState* get();

    //Transitions
    bool enter();
    bool exit();

    //Main loop functions
    void handleEvent( SDL_Event& e );
    void update();
    void render();

private:
    //Level dimensions
    const static int LEVEL_WIDTH = SCREEN_WIDTH;
    const static int LEVEL_HEIGHT = SCREEN_HEIGHT;

    //Static instance
    static RedRoomState sRedRoomState;

    //Private constructor
    RedRoomState();

    //Room textures
    LTexture mBackgroundTexture;

    //Game objects
    Door mExitDoor;
};

class BlueRoomState : public GameState
{
public:
    //Static accessor
    static BlueRoomState* get();

    //Transitions
    bool enter();
    bool exit();

    //Main loop functions
    void handleEvent( SDL_Event& e );
    void update();
    void render();

private:
    //Level dimensions
    const static int LEVEL_WIDTH = SCREEN_WIDTH;
    const static int LEVEL_HEIGHT = SCREEN_HEIGHT;

    //Static instance
    static BlueRoomState sBlueRoomState;

    //Private constructor
    BlueRoomState();

    //Room textures
    LTexture mBackgroundTexture;

    //Game objects
    Door mExitDoor;
};
Here the are red and blue room game states. They pretty much work the same except that they have different backgrounds and the door is in different place.
RedRoomState* RedRoomState::get()
{
    //Get static instance
    return &sRedRoomState;
}

bool RedRoomState::enter()
{
    //Loading success flag
    bool success = true;

    //Load background
    if( !mBackgroundTexture.loadFromFile( "06_state_machines/redroom.png" ) )
    {
        printf( "Failed to load blue room background!\n" );
        success = false;
    }

    //Place game objects
    mExitDoor.set( ( LEVEL_WIDTH - Door::DOOR_WIDTH ) / 2, LEVEL_HEIGHT - Door::DOOR_HEIGHT );
    gDot.set( ( LEVEL_WIDTH - Dot::DOT_WIDTH ) / 2, LEVEL_HEIGHT - Door::DOOR_HEIGHT - Dot::DOT_HEIGHT * 2 );

    return success;
}

bool RedRoomState::exit()
{
    //Free background
    mBackgroundTexture.free();

    return true;
}

void RedRoomState::handleEvent( SDL_Event& e )
{
    //Handle dot input
    gDot.handleEvent( e );
}

void RedRoomState::update()
{
    //Move dot
    gDot.move( LEVEL_WIDTH, LEVEL_HEIGHT );

    //On exit collision
    if( checkCollision( gDot.getCollider(), mExitDoor.getCollider() ) )
    {
        //Go back to overworld
        setNextState( OverWorldState::get() );
    }
}

void RedRoomState::render()
{
    //Center the camera over the dot
    SDL_Rect camera = { 0, 0, LEVEL_WIDTH, LEVEL_HEIGHT };

    //Render background
    mBackgroundTexture.render( 0, 0, &camera );

    //Render objects
    mExitDoor.render();
    gDot.render( camera );
}

//Declare static instance
RedRoomState RedRoomState::sRedRoomState;

RedRoomState::RedRoomState()
{
    //No public instantiation
}


BlueRoomState* BlueRoomState::get()
{
    //Get static instance
    return &sBlueRoomState;
}

bool BlueRoomState::enter()
{
    //Loading success flag
    bool success = true;

    //Load background
    if( !mBackgroundTexture.loadFromFile( "06_state_machines/blueroom.png" ) )
    {
        printf( "Failed to load blue room background!\n" );
        success = false;
    }

    //Position game objects
    mExitDoor.set( ( LEVEL_WIDTH - Door::DOOR_WIDTH ) / 2, 0 );
    gDot.set( ( LEVEL_WIDTH - Dot::DOT_WIDTH ) / 2, Door::DOOR_HEIGHT + Dot::DOT_HEIGHT * 2 );

    return success;
}

bool BlueRoomState::exit()
{
    //Free background
    mBackgroundTexture.free();

    return true;
}

void BlueRoomState::handleEvent( SDL_Event& e )
{
    //Handle dot input
    gDot.handleEvent( e );
}

void BlueRoomState::update()
{
    //Move dot
    gDot.move( LEVEL_WIDTH, LEVEL_HEIGHT );

    //On exit collision
    if( checkCollision( gDot.getCollider(), mExitDoor.getCollider() ) )
    {
        //Back to overworld
        setNextState( OverWorldState::get() );
    }
}

void BlueRoomState::render()
{
    //Center the camera over the dot
    SDL_Rect camera = { 0, 0, LEVEL_WIDTH, LEVEL_HEIGHT };

    //Render background
    mBackgroundTexture.render( 0, 0, &camera );

    //Render objects
    mExitDoor.render();
    gDot.render( camera );
}

//Declare static instance
BlueRoomState BlueRoomState::sBlueRoomState;

BlueRoomState::BlueRoomState()
{
    //No public instantiation
}
The red room and blue room are both simple and fairly similar to each other. The enter functions load the background and place the exit door and dot. The only thing that changes is which background it loads and where the
dot and exit are placed.
The event handlers handle dot input, the update() function moves the dot and handles the collision to transition back to the overworld, and render() renders the background with game objects.
The event handlers handle dot input, the update() function moves the dot and handles the collision to transition back to the overworld, and render() renders the background with game objects.
//Hollow exit state
ExitState* ExitState::get()
{
    return &sExitState;
}

bool ExitState::enter()
{
    return true;
}

bool ExitState::exit()
{
    return true;
}

void ExitState::handleEvent( SDL_Event& e )
{

}

void ExitState::update()
{

}

void ExitState::render()
{

}

ExitState ExitState::sExitState;

ExitState::ExitState()
{

}
In case you were wondering what the exit state does, the answer is nothing. It's a dummy state, but in larger games it's not uncommon to have an exit state that cleans up things before the game terminates.
void close()
{
    //Free the surfaces
    gDotTexture.free();

    //Close the font that was used
    TTF_CloseFont( gFont );
    gFont = NULL;

    //Destroy windows
    SDL_DestroyRenderer( gRenderer );
    SDL_DestroyWindow( gWindow );
    gWindow = NULL;
    gRenderer = NULL;

    //Quit SDL subsystems
    TTF_Quit();
    IMG_Quit();
    SDL_Quit();
}
In close function, we clean up the global assets and quit SDL.